Configuring compliance
Compliance ensures that artifact owners provide the information required for security, privacy, and governance.
Admins define the rules, forms, conditions, and approval logic for each artifact category.
Compliance form builder
Impliancy provides a dynamic form builder where admins can:
- Add fields (text, number, boolean, dropdown, etc.). See Compliance Forms for more details
- Create dependencies and conditional fields
- Customize forms for:
- Environments
- Power Apps
- Cloud flows
- Desktop flows
- Bots
Each category can have a different structure.
How to create a form
You can easily create your own form by clicking on Compliance Management in the navigation. Let's create an example form together that contains two, or three questions:
- Business Criticality (a select box with two options)
- Business Critical
- Not business critical
- Mitigation Plan (only if Business Criticality is set to Business Critical)
- How many users are using this app?
If the user selects Not business critical, he will be presented with only two questions. Otherwise, three.
Example Form
- Click on Add form on the top right
- Add name and a description (optional), then click on Edit form
- You can group blocks of questions together with the Fields group container. Drag & drop the Fields group container onto the Design panel
- Click onto the dragged element until a form on the right hand side appears (Selected item).
- Click inside the
keyfield and set it tobusinessCriticalityGroupand click on Save changes - Drag & drop the Row container inside the existing businessCriticality (Fields group)-container and select it
- On the right hand side, click inside the
Keyfield and set it torow1and click on Save changes - Now, drag the form input Select inside the row you've added
- Click inside the
Keyfield and set it tobusinessCriticalitySelect - Click inside the
Labelfield and set it toBusiness Criticality - Click on Add new entry and create two records. Set the first record's Value to
businessCriticaland the Text toBusiness Critical. The second record's Value tonotBusinessCriticaland the Text toNot business critical - Under Expressions (Advanced), under Required set the field to
Alwaysand click on Save changes - Drag & drop a new Row container inside the existing businessCriticality (Fields group)-container and select it
- On the right hand side, click inside the
Keyfield and set it torow2and click on Save changes - Drag the form input File inside the row you've added and select it
- On the right hand side, click inside the
Keyfield and set it tomitigationPlan - Click inside the
Labelfield and set it toMitigation Plan - Under Expressions (Advanced), under Required set the value
Only if, then Add new entry and on the Value left operand set it to the value you've set as key from the business criticality field. However, you need to add the whole path. Since the field is inside a row and the row inside a field group, we would need to addbusinessCriticalityGroup.row1.businessCriticalitySelect. The operator can be set toEqualsand the Value right operand tobusinessCritical(since this the key of an option we've set in the select field) - Repeat step 18, but do the same under Hidden and instead of the Setting being
Only if, set it toOnly if notand click on Save changes
Almost there, grab a gummy bear. Hint: If you don't have gummy bears, chocolate does the trick as well
- Repeat steps 3-7, but instead of
businessCriticality, set it tosharingand make sure the new fields group is below the first one you've created - Drag the form input Input inside the new row you've added and select it
- Click inside the
Keyfield and set it tosharedUsers - Click inside the
Labelfield and set it toHow many users are using this app? - Click inside the
Placeholderfield, set it to10and click on Save changes - Click on Save on the bottom right of the form
Now, if you'd like to activate a manual compliance check by an admin (for example, when Business Criticality is set to Business Critical), then following the next steps, otherwise, jump to step 29
- Select Add new entry under Conditions
- Set the Value left operand to the value you've set as key from the business criticality field. Again with the whole path, which is
businessCriticalityGroup.businessCriticalityRow.businessCriticality. The operator can be set toEqualsand the Value right operand tobusinessCritical - Click on Create form
Congratulations! You've just created your first form. Now, when the user fills out a compliance form and selects 'Business Critical', he needs to upload a mitigation plan as well.
You can download the created example form here, if you like. Or, if you'd like to have a more complex form, here's another example.
Approval types
Auto approval
The system automatically approves a submission if the owner’s answers match predefined criteria.
Useful for low-risk scenarios.
Manual approval
An admin must review and approve the submission.
Required for high-risk or business-critical artifacts.
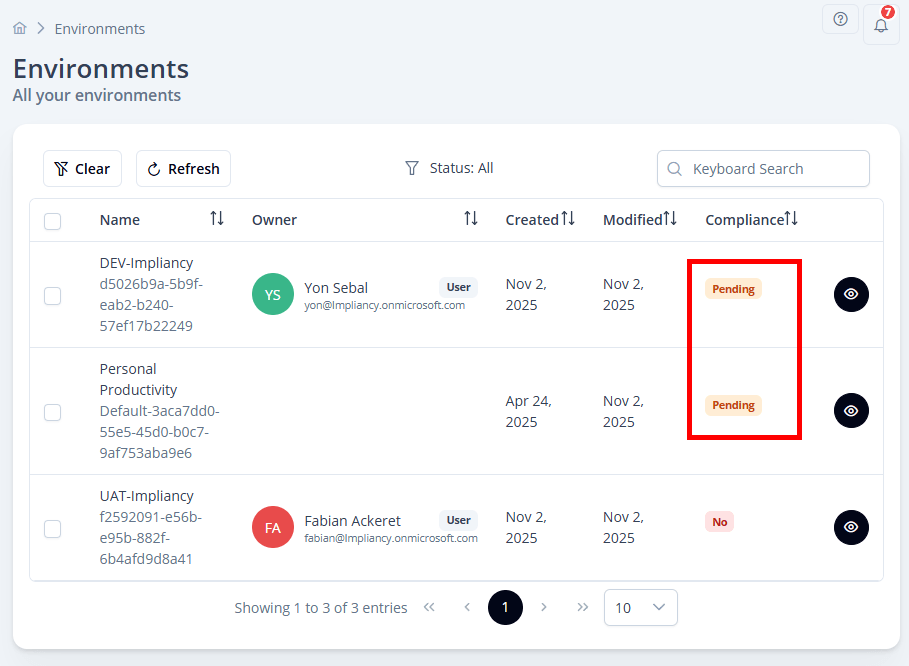
In the overview table of each artifact, you can easily spot the artifacts which are pending review:
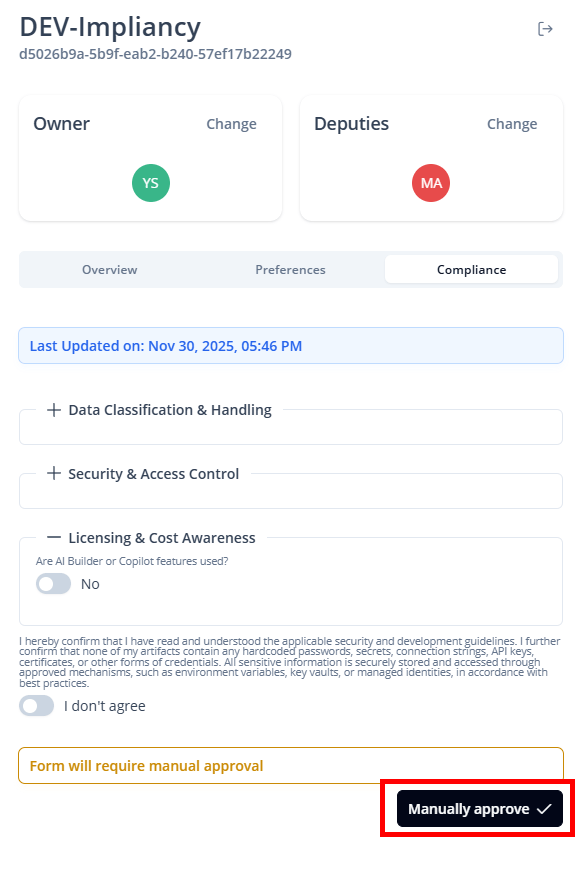
By clicking on the on the eye icon (), then Compliance, you'll see the filled out form by the owner/deputy. After carefully reviewing it, you can approve it by clicking on Manually approve:
Validity period
Approved compliance forms remain valid for 180 days.
After that, the owner must submit a new form.
Impliancy will:
- Notify owners when renewal is needed
- Mark artifacts as non-compliant when the form expires
Compliance lifecycle
- Admin defines form and approval rules
- Owner or deputy completes the form
- Auto or manual approval
- Artifact remains compliant for 180 days
- Renewal requested automatically